User Roles & Access Management
This guide explains how LawFlow access should be managed: user roles, permissions, restricted records, department visibility and admin-only controls.
Understand what Access Management controls
Access Management is used to decide which users can access different LawFlow pages, records, departments, matter types, calendars and administrative controls.
Employee identity and department access
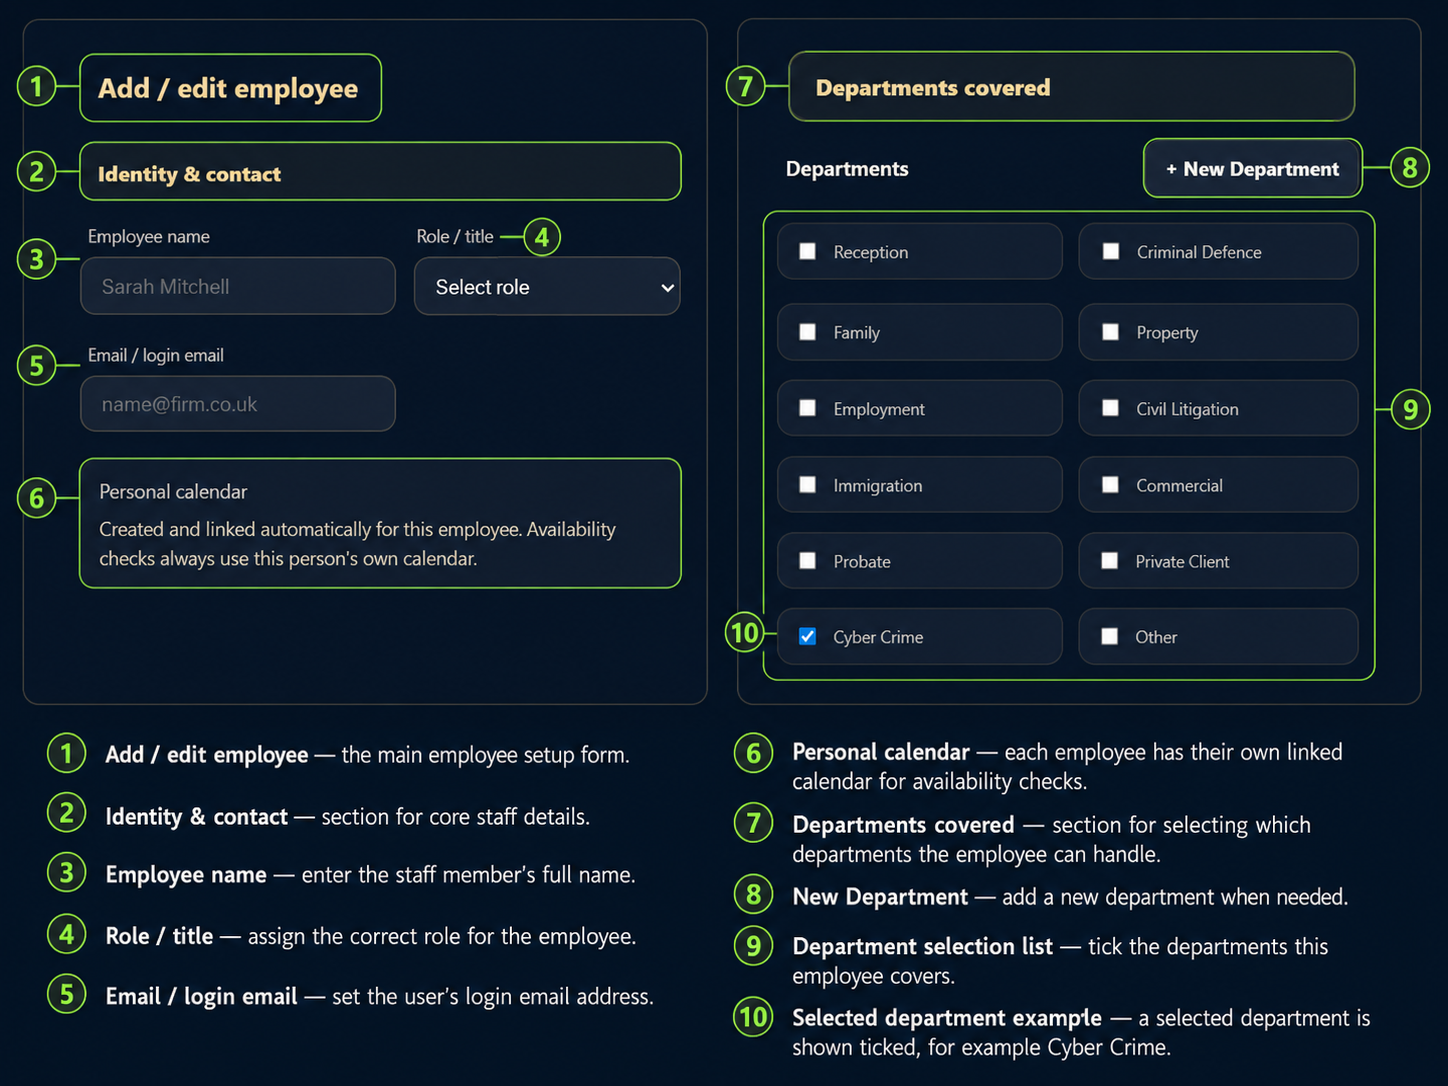
Add / edit employee — the main employee setup form used to create or update a staff member.
Identity & contact — stores the user’s name, role, login email and personal calendar link.
Role / title — assigns the correct working role for the employee.
Personal calendar — ensures availability checks use this employee’s own linked calendar.
Departments covered — selects which departments this employee can access and work within.
New Department — allows authorised admins to add a new department when required.
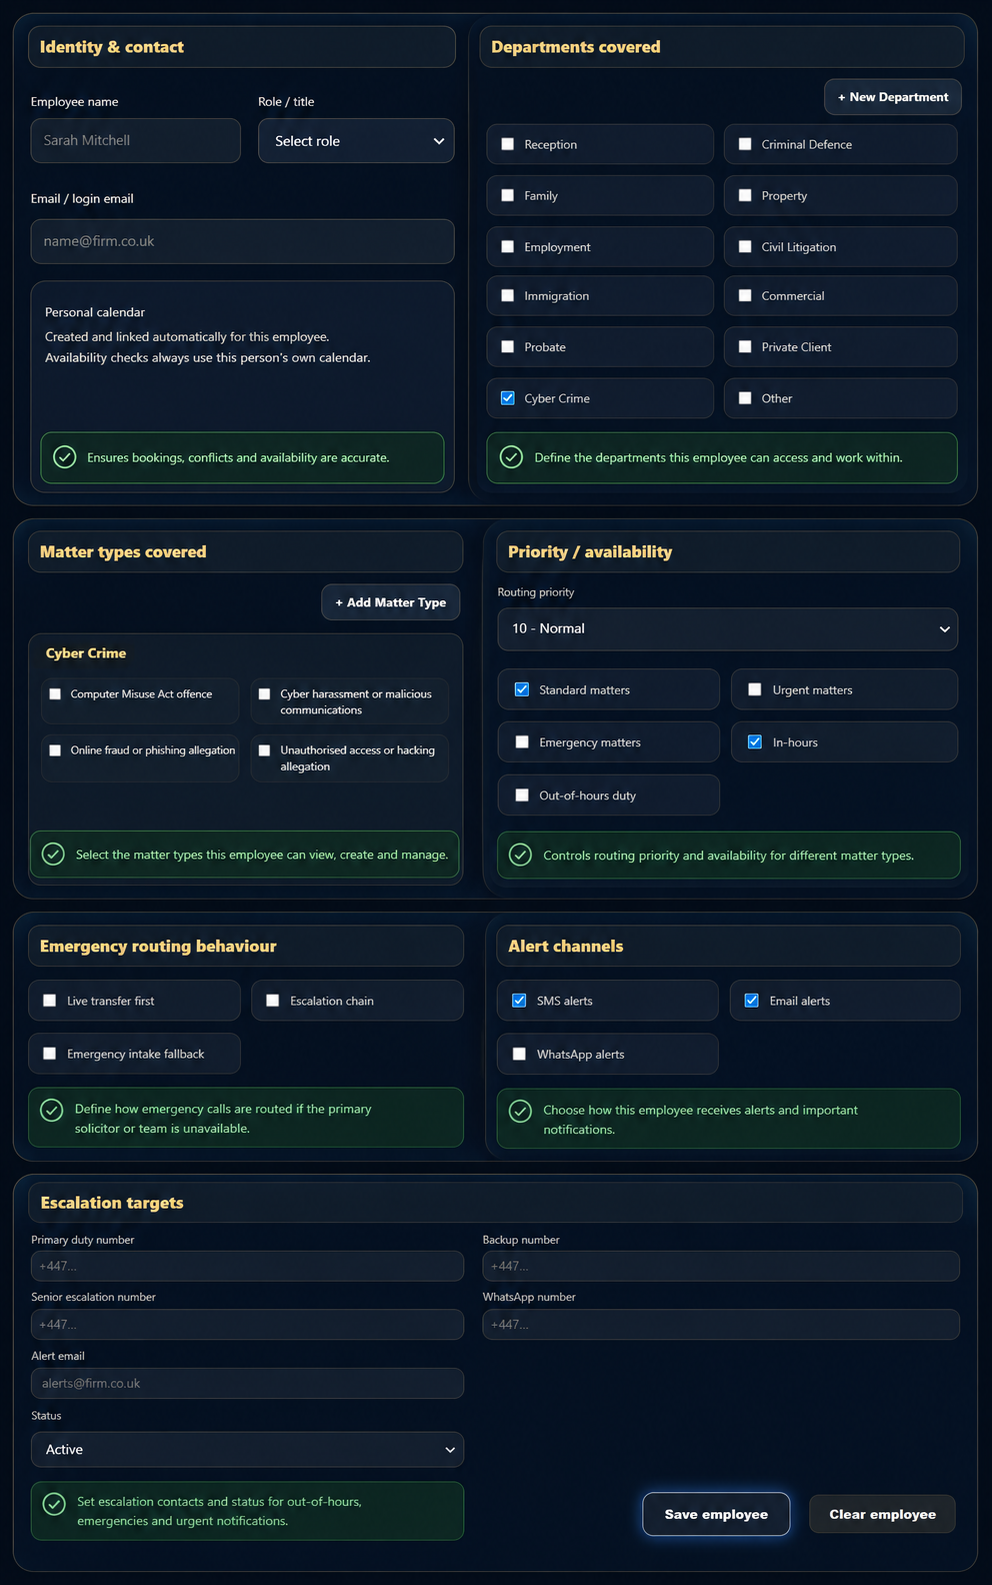
Matter coverage, routing and alerts
Matter types covered — selects the matter types this employee can view, create or manage within a department.
Priority / availability — controls routing priority and whether the employee handles standard, urgent, emergency, in-hours or out-of-hours work.
Emergency routing behaviour — defines whether live transfer, escalation chain or emergency fallback should apply.
Alert channels — controls how the employee receives important notifications, such as SMS, email or WhatsApp alerts.
Escalation targets — stores the duty, backup, senior escalation, WhatsApp and alert email contacts.
Status and save controls — confirms whether the employee is active and saves the completed setup.
Know the main user role types
Different users need different levels of access. A receptionist, solicitor, manager, compliance user and system admin should not all have the same permissions.
Common role examples
Admin — manages setup, permissions, configuration and sensitive system controls.
Manager — reviews operational records, team activity, allocation and follow-up.
Solicitor — handles assigned matters, consultations, availability and matter-specific work.
Reception / Intake — manages calls, callbacks, enquiries and front-line record capture.
Compliance — reviews audit history, restricted records, conflict status and evidence trails.
Read-only — can view approved information but cannot change operational records.
Separate viewing, editing and admin rights
Permissions should be granted based on the user’s actual responsibility. Viewing a record is different from editing it, approving it, deleting it, exporting it or changing system-wide settings.
Control department and matter visibility
Users may only need access to specific departments, matter types or client records. LawFlow should be configured so users can see the work they need without exposing unrelated or restricted information.
Staff roles and override controls
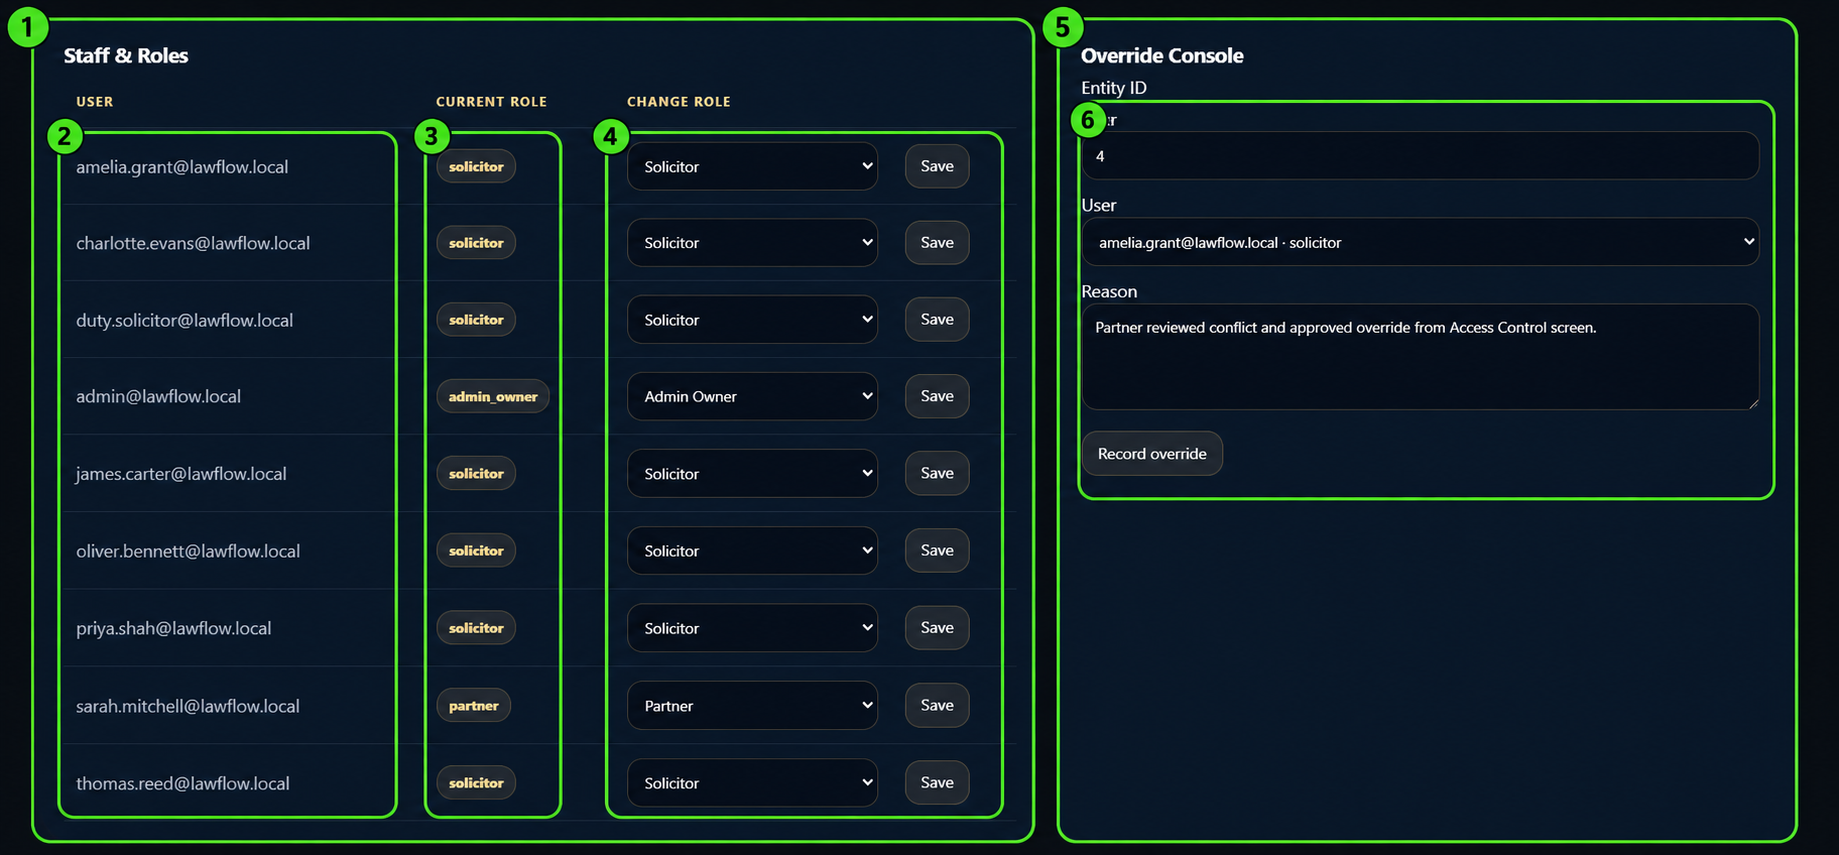
Staff & Roles — lists users who can access LawFlow and shows their current role.
User — identifies the staff account being reviewed or changed.
Current Role — shows the role currently assigned to that user, such as solicitor, partner or admin owner.
Change Role — lets an authorised admin update the user’s role and save the change.
Override Console — records a controlled access override where a restricted entity or conflict needs authorised access.
Override details — captures the entity, user and reason so the decision can be audited later.
Protect sensitive and permission-controlled records
Some records should be hidden, partially hidden or limited to authorised users. Restricted records protect sensitive matters, conflict information and records that require solicitor or admin approval.
Respect solicitor boundaries and calendar privacy
Solicitor-level access should protect assigned matters, private availability, calendar privacy and matter ownership. Users should only see solicitor information needed for routing, booking or authorised management.
Audit Centre access review
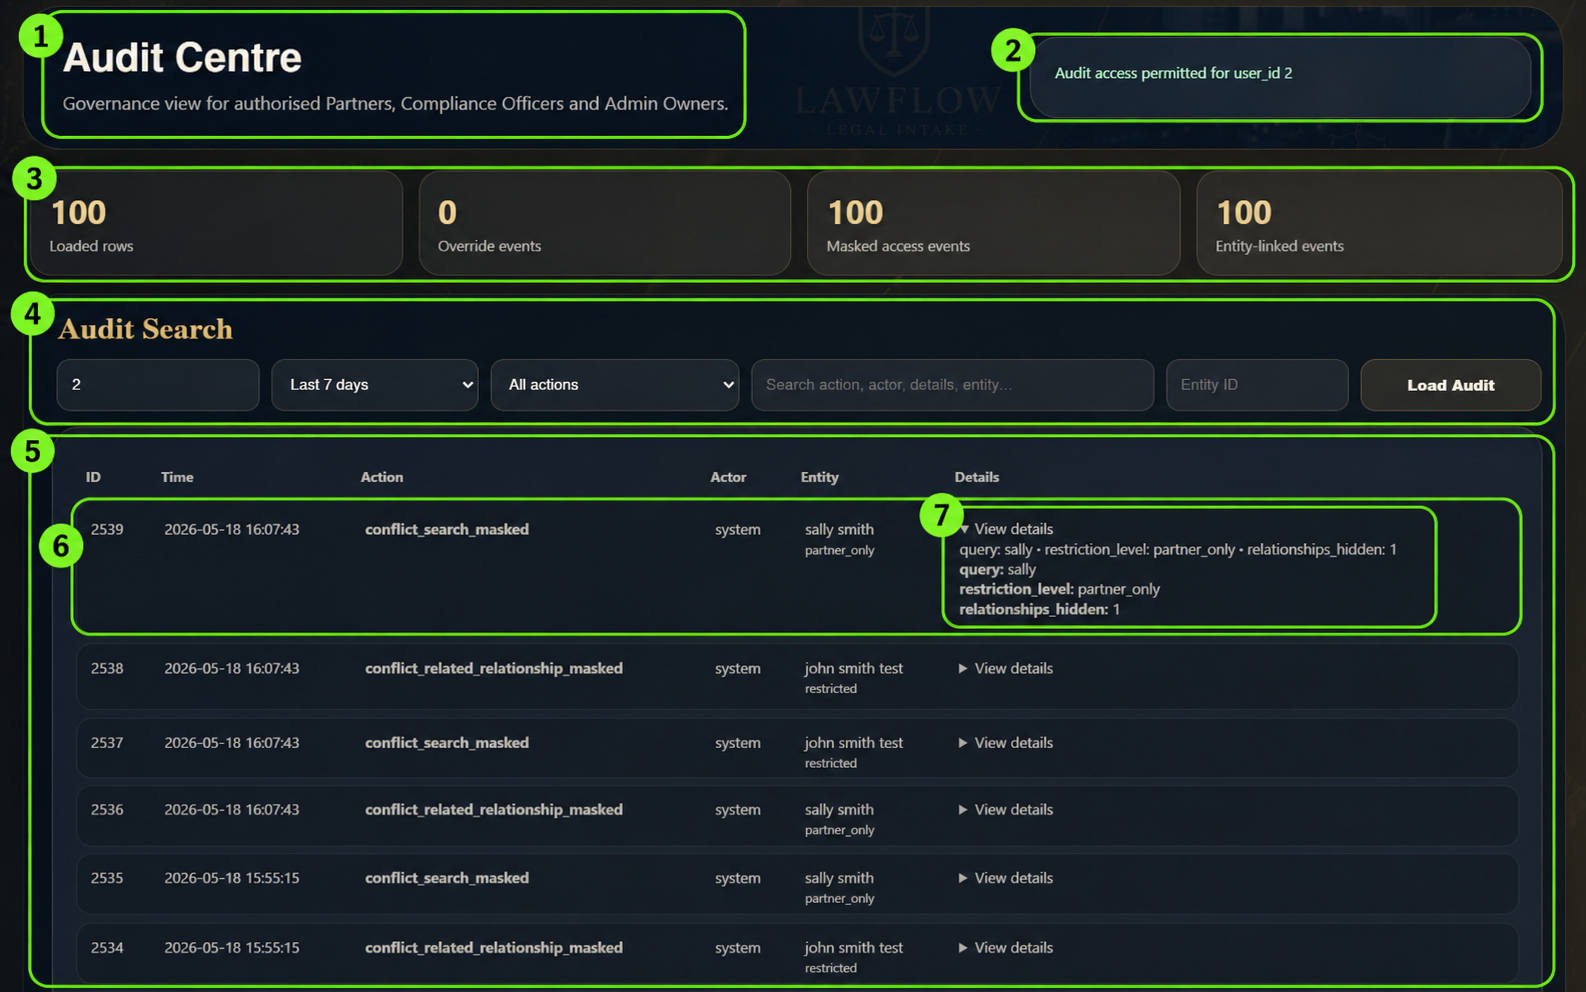
Audit Centre — governance view for authorised partners, compliance officers and admin owners.
Access notice — confirms when audit access is permitted for the current user.
Summary totals — shows loaded rows, override events, masked access events and entity-linked events.
Audit Search — filters audit history by user, date range, action type, search term and entity ID.
Audit results — lists recorded events with ID, time, action, actor, entity and detail columns.
Event row — shows the specific audit action that was recorded.
View details — expands the event to show query, restriction level and hidden relationship information.
Keep access changes traceable
Changes to access, permissions and restricted records should be reviewable. Users should be able to see who made important changes, when they were made and what was affected.
Follow a controlled setup process
Access should be configured in a predictable order so no user receives too much access by accident.
Recommended setup sequence
Create user — add the user record and basic identity details.
Assign role — choose the closest role for their job function.
Set departments — select the departments they are allowed to work with.
Set matter coverage — select matter types they can access or handle.
Apply restrictions — add any restricted-record or admin-control limits.
Test access — verify the user can see what they need and nothing more.